Summary: We will use Bitlocker to secure device data, requiring a PIN or Password to boot into Windows or read the hard drive. This is aimed to be the definitive guide to getting started and managing BitLocker.
Technical Details
- Bitlocker locks the key for decryption with multiple keys (“Protectors”). This can include TPM, TPM and PIN, Password, a USB key, and even certificates.
- You can have multiple ways to unlock the decryption key
- The keys appear transparent to the user, even during recovery
- The hard drive can be removed and put into another computer. The data will remain inaccessible until you put in the recovery key
- Speed seems to be the same on a computer with a TPM module installed (which should be all modern computers)
- The default is AES-128; you can change this to AES-256 if you need
- Users can lock removeable drives without admin intervention.
Requirements
- Active Directory setup. We will store the recovery keys in AD so it is replicated to the other domain controllers, and we maintain locked access to the recovery keys. This will work on Samba AD, as well as Windows Server-based Active Directory domains.
- Windows 10 Pro or higher (both the targets, and your tech box where you manage it from)
- RSAT tools installed on tech box
- HIGHLY RECOMMENDED that you do NOT destroy your Active Directory domain! Add a new DC during your server setup to the existing domain, and ensure the recovery keys stay put. If not, your client devices may be without a recovery method, leading to data loss if they forget their password.
On the tech box
Add the RSAT tools - at a minimum, Active Directory Users and Computers, BitLocker Recovery Tools and Group Policy Management Console. You can also add it with the Command Line:
Dism.exe /Online /Add-Capability /CapabilityName:Rsat.ActiveDirectory.DS-LDS.Tools~~~~0.0.1.0
Dism.exe /Online /Add-Capability /CapabilityName:Rsat.CertificateServices.Tools~~~~0.0.1.0
Dism.exe /Online /Add-Capability /CapabilityName:Rsat.GroupPolicy.Management.Tools~~~~0.0.1.0
Dism.exe /Online /Add-Capability /CapabilityName:Rsat.Bitlocker.Recovery.Tools~~~~0.0.1.0
regsvr32.exe c:\windows\system32\bdeaducext.dll
Create the OU for the group you want to manage. In this example, we will use
OU=Admin Machines,OU=Staff_Computers,OU=Staff.Create a new GPO object (i.e.
Bitlocker Policy). Right-click it, and choose Edit.Apply the following settings under Computer Configuration \ Policies \ Administrative Templates \ Windows Components \ Bitlocker Drive Encryption:
- Store BitLocker recovery information in Active Directory Domain Services = Enabled
- Require BitLocker backup to AD DS
- Recovery passwords and key packages
- Provide the unique idendifiers for your organization = Enabled
- BitLocker identification field =
SD57 - Allowed BitLocker identification field =
SD57
- BitLocker identification field =
- Fixed Data Drives
- Choose how BitLocker-protected fixed drives can be recovered = Enabled
- Allow data recovery agent
- Allow 48-digit recovery password
- Allow 256-bit recovery key
- [_] Omit recovery options from the BitLocker setup wizard
- Save BitLocker recovery information to AD DS for fixed data drives
- Backup recovery passwords and key packages
- Do not enable BitLocker until recovery information is stored to AD DS for fixed data drives
- Choose how BitLocker-protected fixed drives can be recovered = Enabled
- Operating System Drives
- Require additional authentication at startup = Enabled
- Allow BitLocker without a compatible TPM (requires a password or a startup key on a USB flash drive)
- Do not allow TPM
- Require startup PIN with TPM
- Do not allow startup key with TPM
- Do not allow startup key and PIN with TPM
- Configure use of hardware-based encryption for operating system drives = Enabled
- Use BitLocker software-based encryption when hardware encryption is not available
- [_] Restrict encryption algorithms and cipher suites allowed for hardware-based encryption
- Restrict crypto algorithms or cipher suites to the following: `2.16.840.1.101.3.4.1.2;2. 16.840.1.101.3.4.1. - Choose how BiLocker-protected operating system drives can be recovered = Enabled
- Allow data recovery agent
- Allow 48-digit recovery password
- Allow 256-bit recovery key
- Omit recovery options from the BitLocker setup wizard
- Save BitLocker recovery information to AD DS for fixed data drives
- Backup recovery passwords and key packages
- Do not enable BitLocker until recovery information is stored to AD DS for fixed data drives
- Require additional authentication at startup = Enabled
- Removable Data Drives
- Configure use of hardware-based encryption for removable data drives = Enabled
- Use BitLocker software-based encryption when hardware encryption is not available
- [_] Restrict encryption algorithms and cipher suites allowed for hardware-based encryption
- Restrict crypto algorithms or cipher suites to the following: `2.16.840.1.101.3.4.1.2;2. 16.840.1.101.3.4.1. - Configure use of passwords for removable data drives = Enabled
- Require password for removable data drive
- Require password complexity
- Minimum password length for removable data drive = 8
- Choose how BitLocker-protected removable drives can be recovered = Enabled
- Allow data recovery agent
- Allow 48-digit recovery password
- Allow 256-bit recovery key
- [_] Omit recovery options from the BitLocker setup wizard
- Save BitLocker recovery information to AD DS for fixed data drives
- Backup recovery passwords and key packages
- Do not enable BitLocker until recovery information is stored to AD DS for fixed data drives
- Configure use of hardware-based encryption for removable data drives = Enabled
- Store BitLocker recovery information in Active Directory Domain Services = Enabled
Close the Group Policy Management Console.
On your target machine
Update the Group Policy from the command prompt:
gpupdate /forceOpen the File Explorer to This PC. Right-click on the C: and choose “Turn on Bitlocker”. The wizard will start, then ask you to enter a PIN that is between 6-20 numbers long. Enter it, then click “Set PIN” to continue.
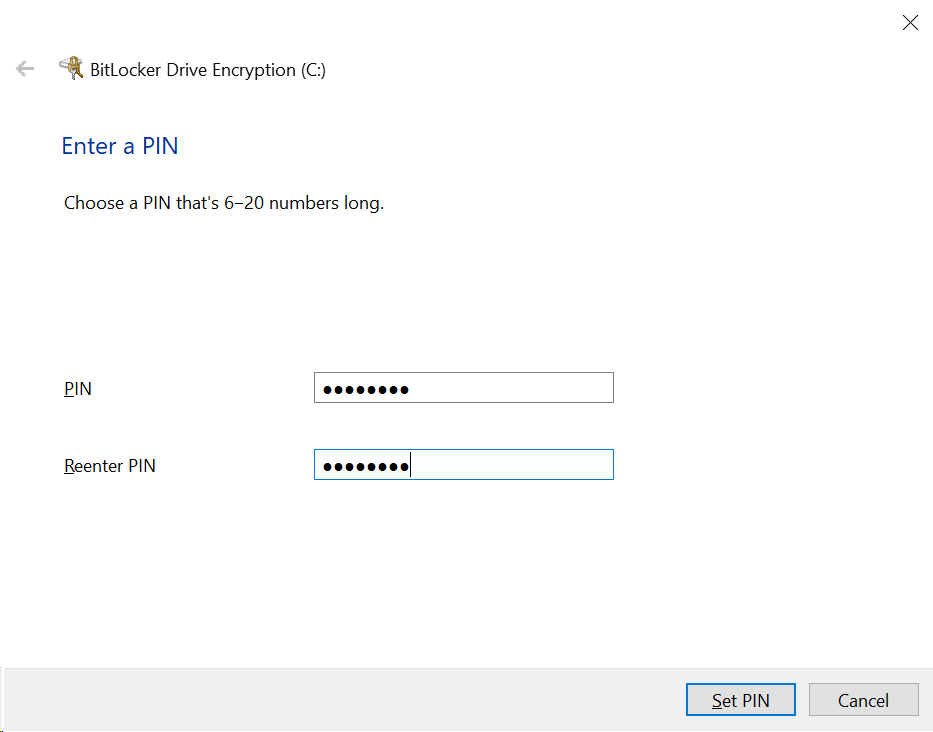
On the next screen, choose “Encrypt used disk space only” and click Next
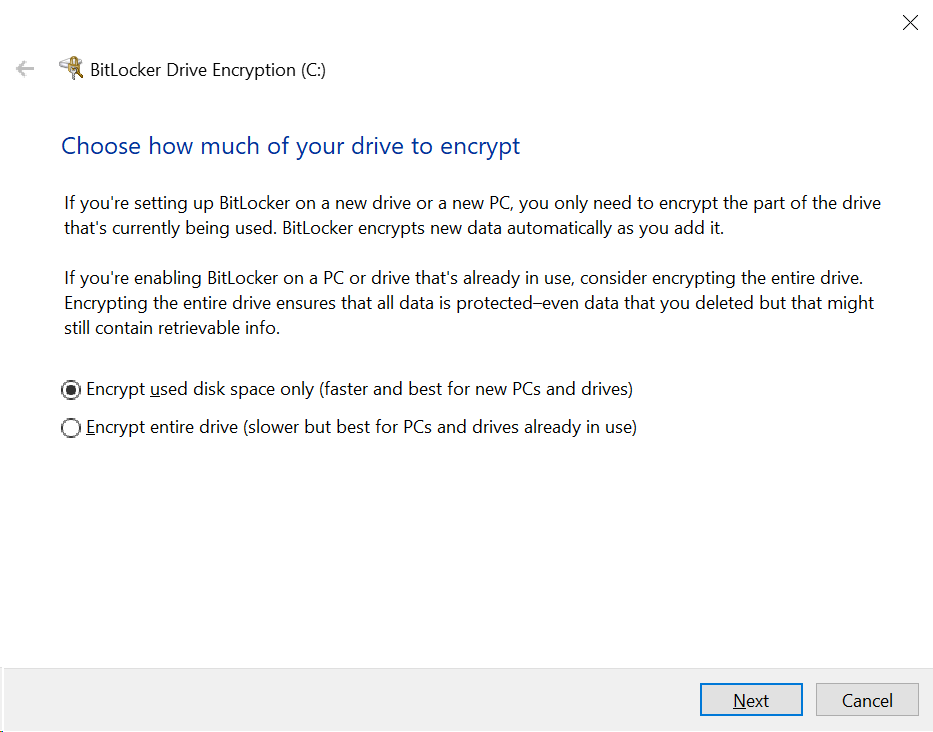
On the next screen, choose “New encryption mode” and click Next
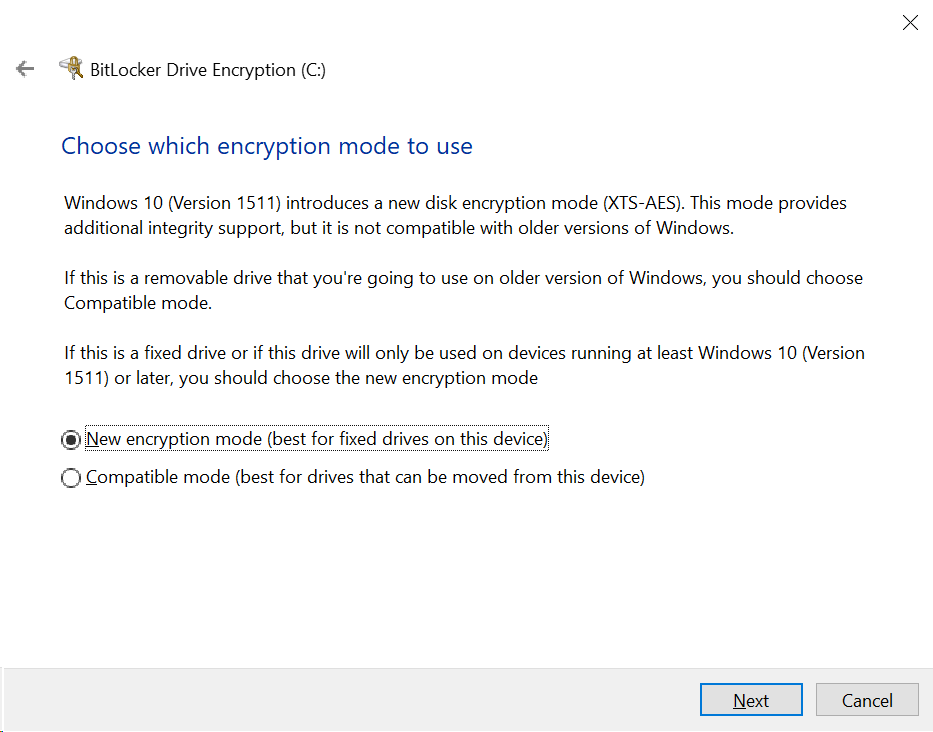
Leave the tick box checked for “ Run BitLocker system check”, then click Continue.
A dialog will appear that the computer needs to be restarted. Click on Restart Now.
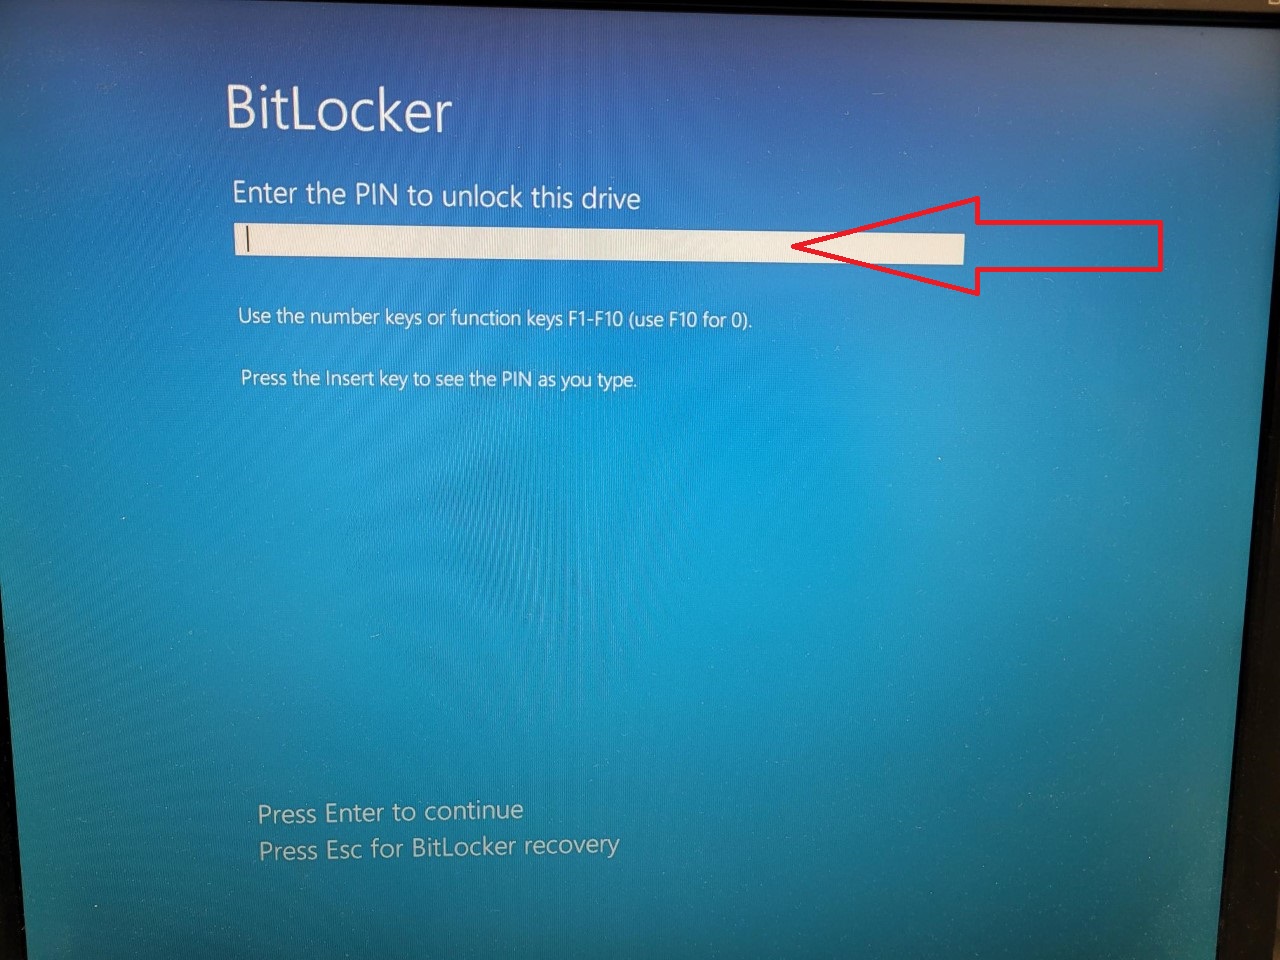
At this point, you will see a blue screen appear, asking to input the PIN. Use the numbers at the top of your keyboard to do so, then Enter to continue loading Windows.
For external drives
External drives appear to be resilient to Bitlocker, in that you can unplug the drive after it’s been encrypted, and you do not need to manually lock it every time you remove it. The recovery keys are still stored in Active Directory, under the computer.
Insert the external drive. Open the File Explorer to This PC. Right-click on the removable drive, and choose “Turn on Bitlocker”.
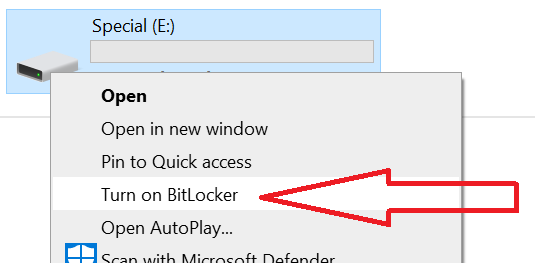
Enter a password and confirm it, containing at least 8 characters, and some complexity (i.e. upper- and lower-case characters, and numbers). If they have a smart card, they can choose to use that to unlock the drive; otherwise, click Next.
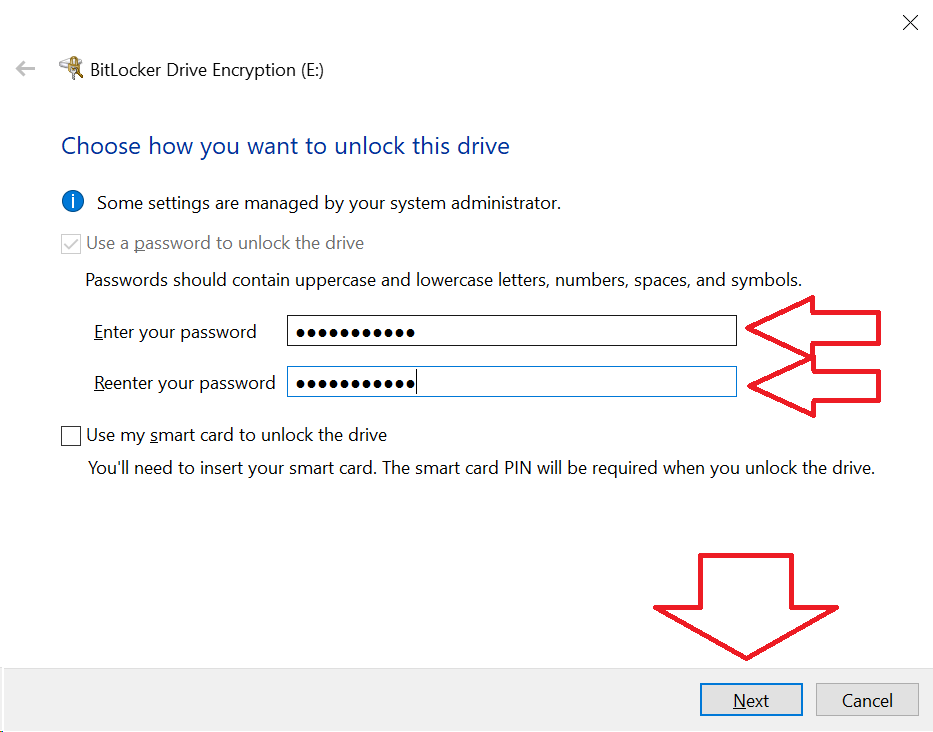
If the user wants to save a copy of the key or print it out, this is their choice. The key will be backed up into Active Directory regardless, but it couldn’t hurt to save it to their H: Drive or the Office drive, as required.
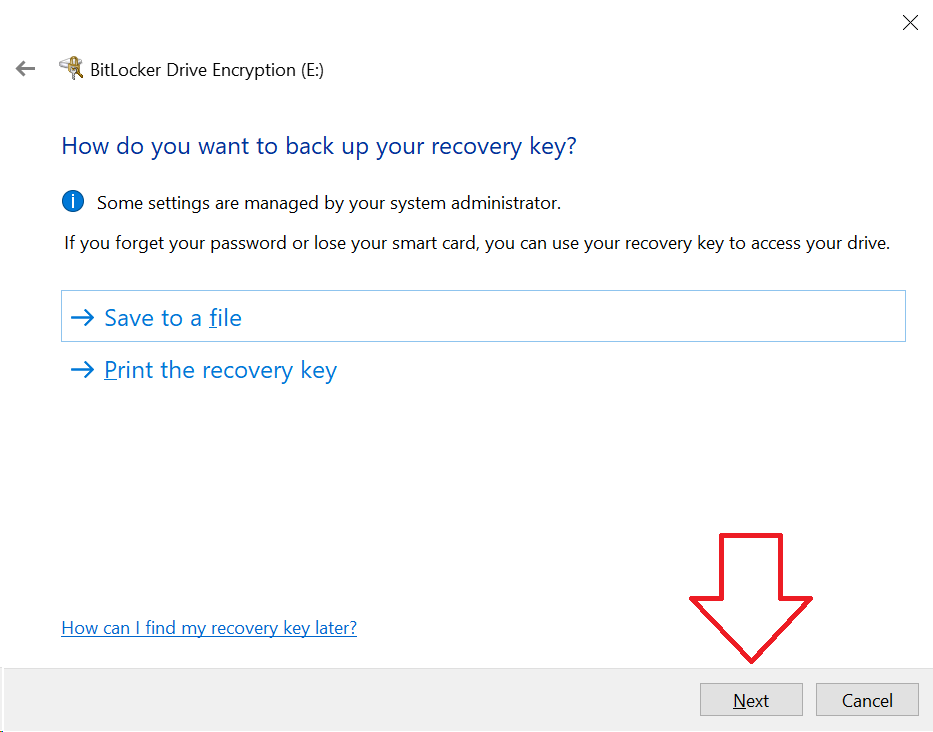
Choose to encrypt the used space only, or the entire drive. If the drive is already in use, choose to encrypt the whole drive. Click Next.
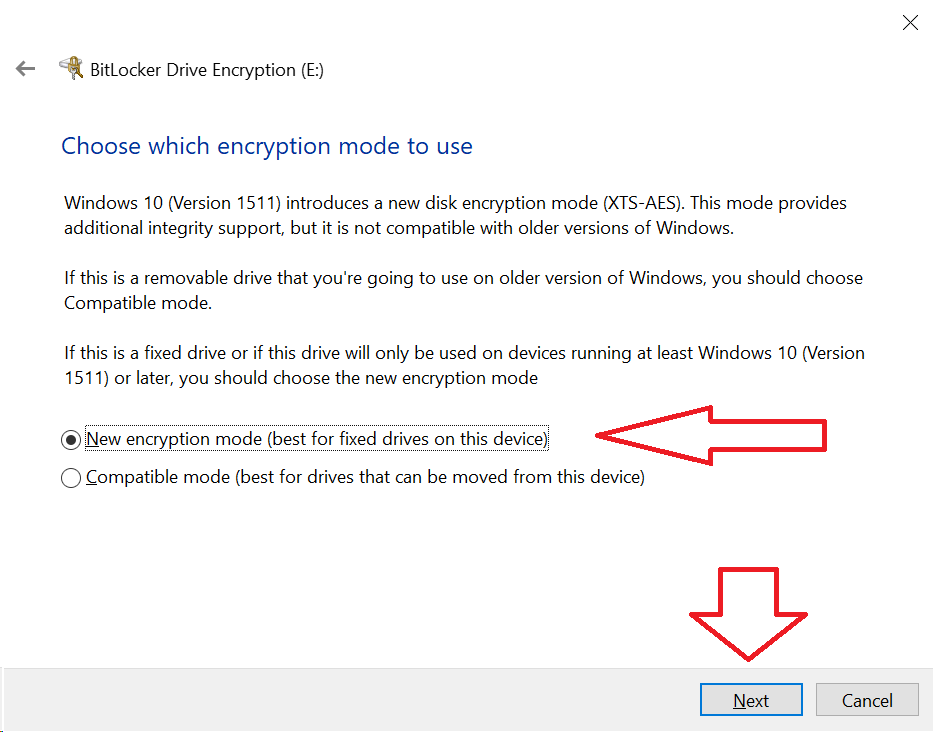
Choosing the Encryption Mode. If the drive is only going to be used in your workplace, choose “(o) New encryption mode”. If they are using this drive with older versions of Windows (i.e. Windows 8.1 at home), leave the default Compatibile mode. Click Next.
Click on the “Start encrypting” button, and wait.
Once you unplug the drive, it will be encrypted on other computers. To test this out, insert it into a Windows 10 computer, and open This PC. You will see the drive has a golden lock on it.

Double-click on the drive to try to open it. You will see a password prompt in the upper right corner of the screen to type your password into. Enter your password for the drive, then click Unlock
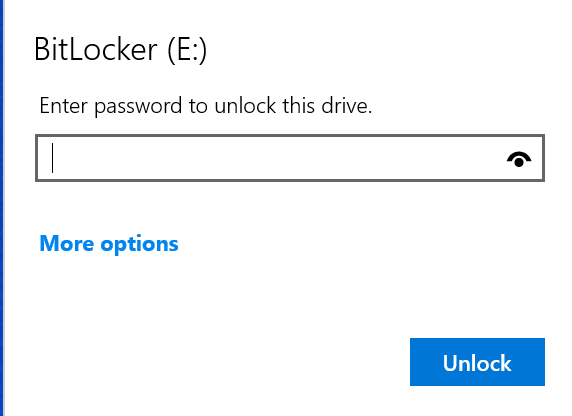
Assuming you entered the correct password, the icon will show an unlocked silver padlock:

Managing BitLocker
Not seeing the Bitlocker Recovery tab
- Check you’re logged in as the Domain Administrator (not only a member of the Domain Admins group - see Delegating authority below)
- Ensure you added all the components. Double check the commands at the start.
- Ensure you applied the Group Policy above to force storing the key in Active Directory.
Changing the PIN
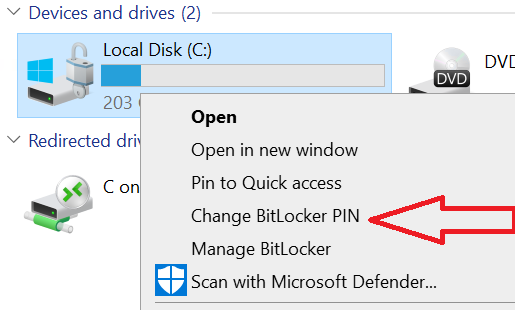
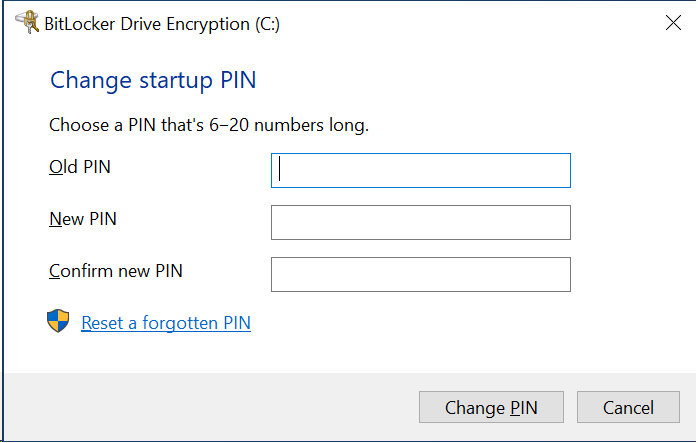
The user can change the PIN number anytime after the drive has been unlocked. Open This PC, right-click on the drive, and choose Change BitLocker PIN.
Recovery Key
The recovery keys are stored in Active Directory. To access it from your tech box:
- Open Active Directory Users and Computers as the Domain Administrator (by default the only user that it will work with. See Delegating authority later on to set this to other users/groups)
- Navigate to the Computer object, and double-click it.
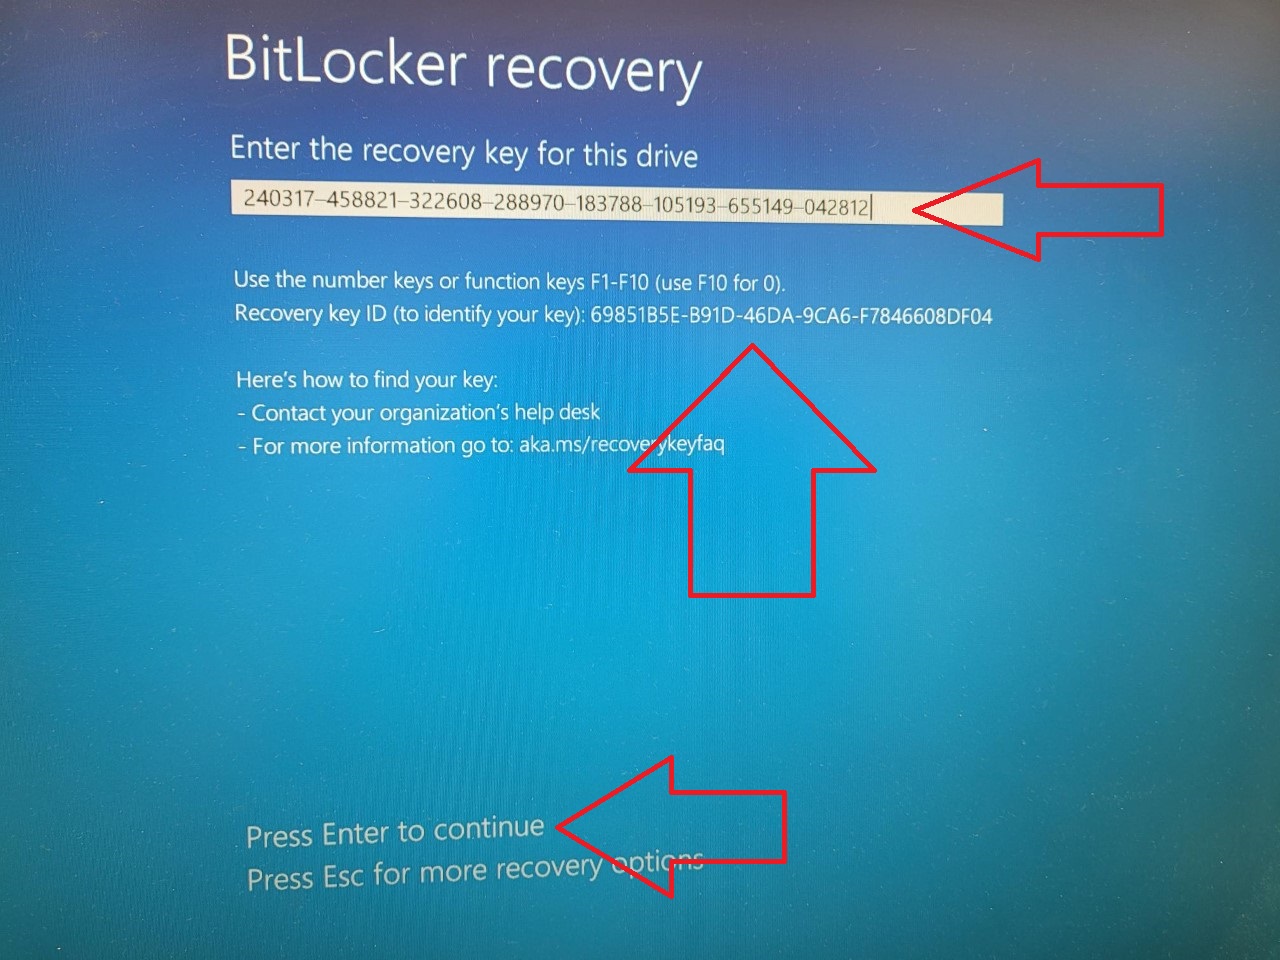
- Click the BitLocker Recovery tab. Ask the user to choose the Recovery option on their computer, and it display a Password ID (labelled as “Recovery key ID”) for that device. Look for the correct ID, then read off the Recovery Password.
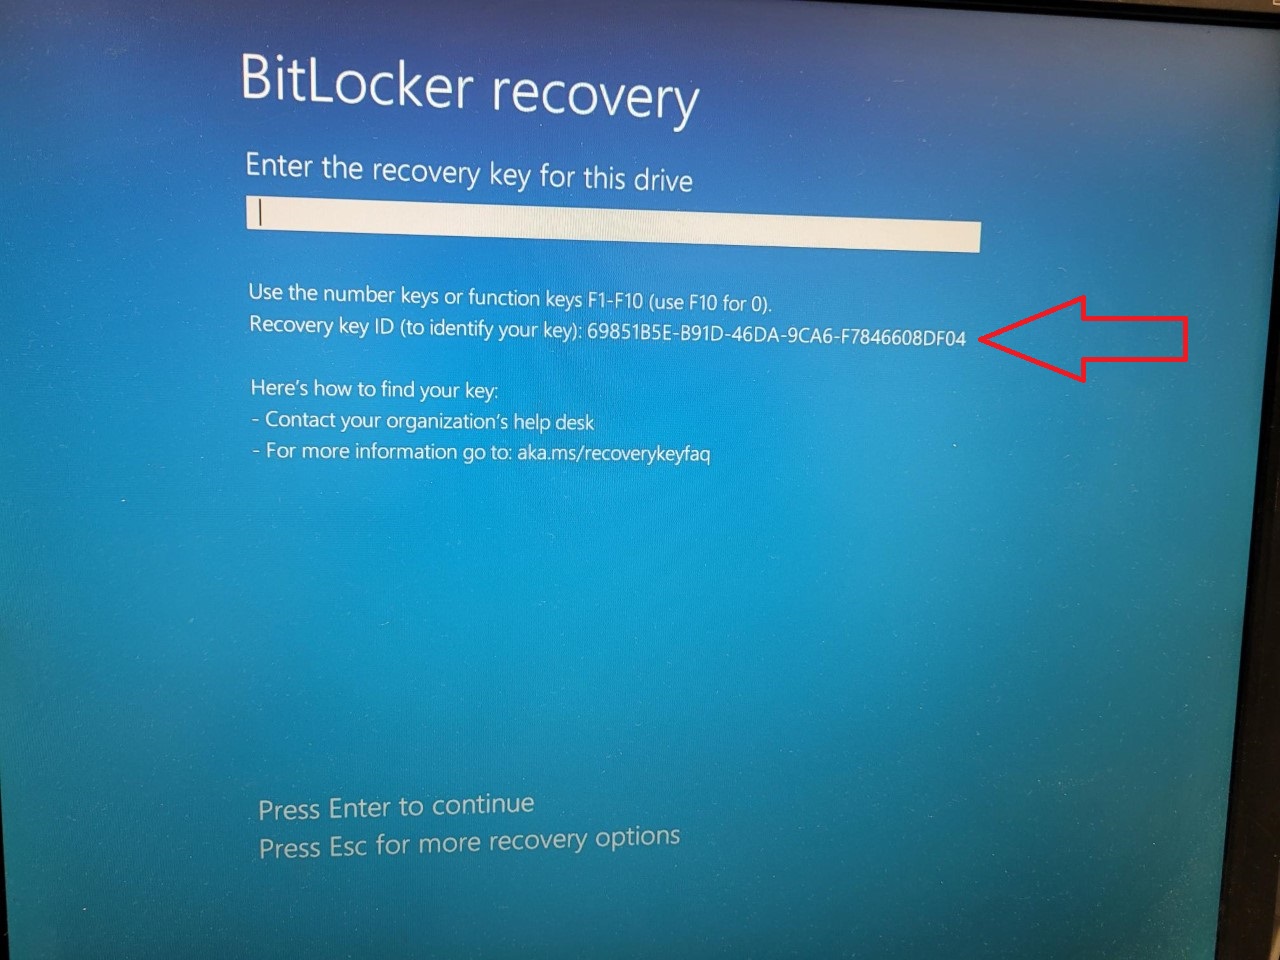
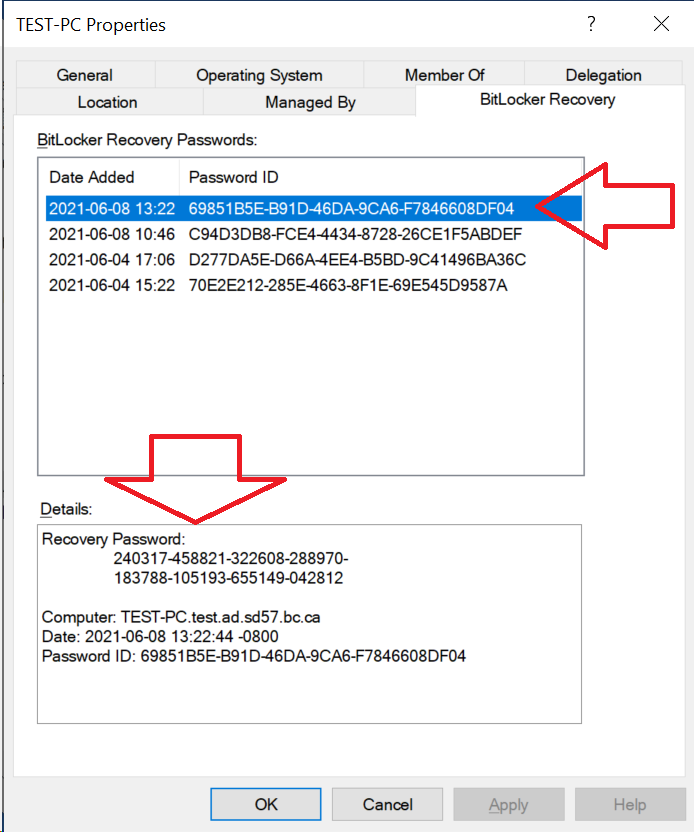
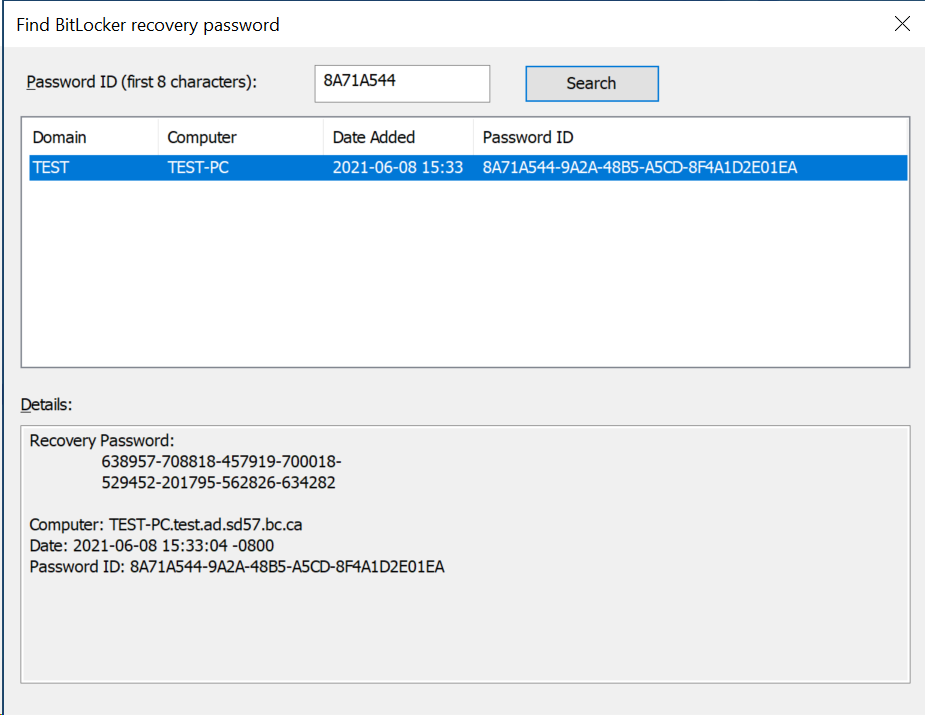
If you don’t see it there, you can search for it by the first 8 characters of the Password ID on their screen:
- Open Active Directory Users and Computers as the Domain Administrator.
- Right-click the domain, and choose “Find Bitlocker Recovery Password…”
- Type in the first 8 characters, and hit Search. The domain controller will search for the password ID, and display any that it finds. Click on the entry to view the Details.
The user enters the recovery password you looked up. Dashes are inserted automatically, and a checksum is ran for each group of 6 numbers. After they enter the numbers, they can log in to the system again.
Changing the PIN if it’s forgotten
If the PIN is forgotten, use the Recovery Key to turn on the computer above, if needed. Once you are on the computer, log in as an Administrator.
- Open the Command Prompt
- Run
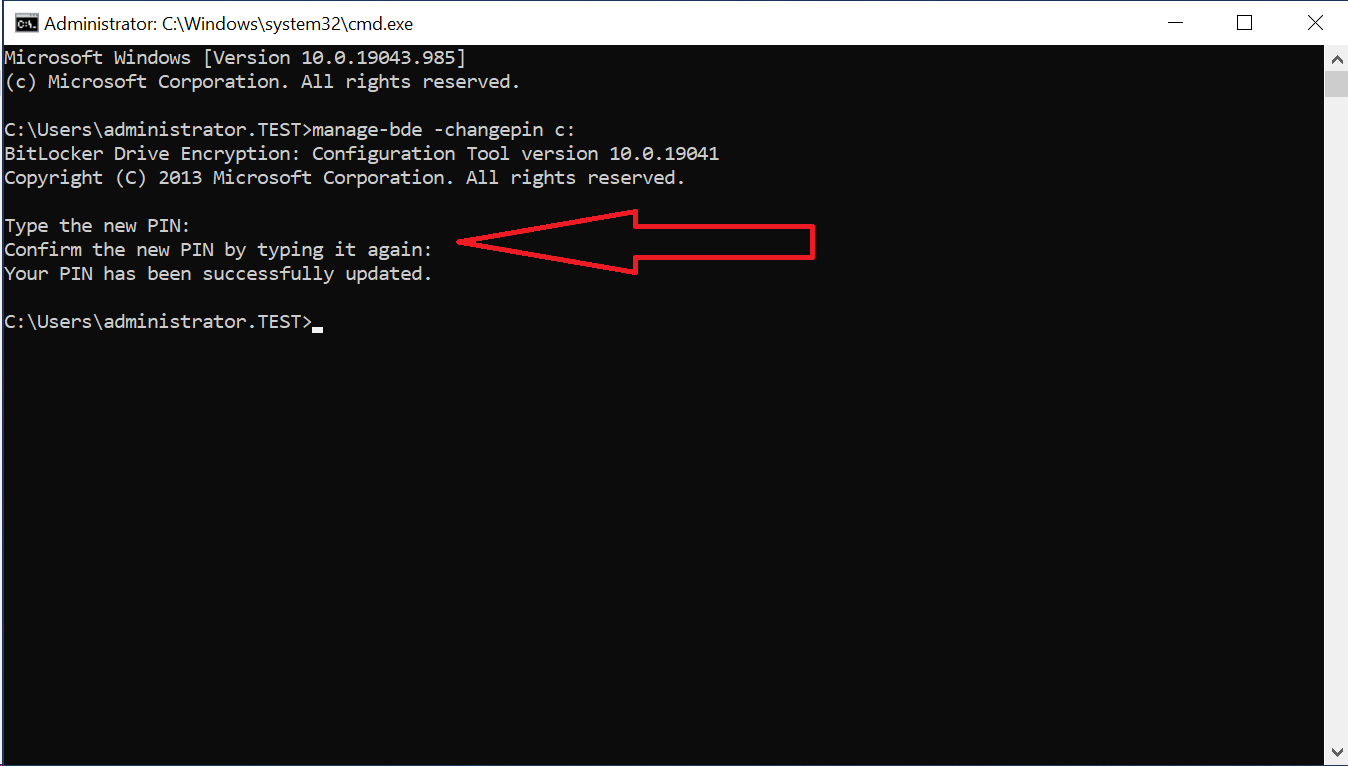
manage-bde -changepin c:. - It will ask for a new PIN, and confirm. It will only accept numbers, and will not display as you’re typing it.
List recovery methods
- Open the Command Prompt
- Run
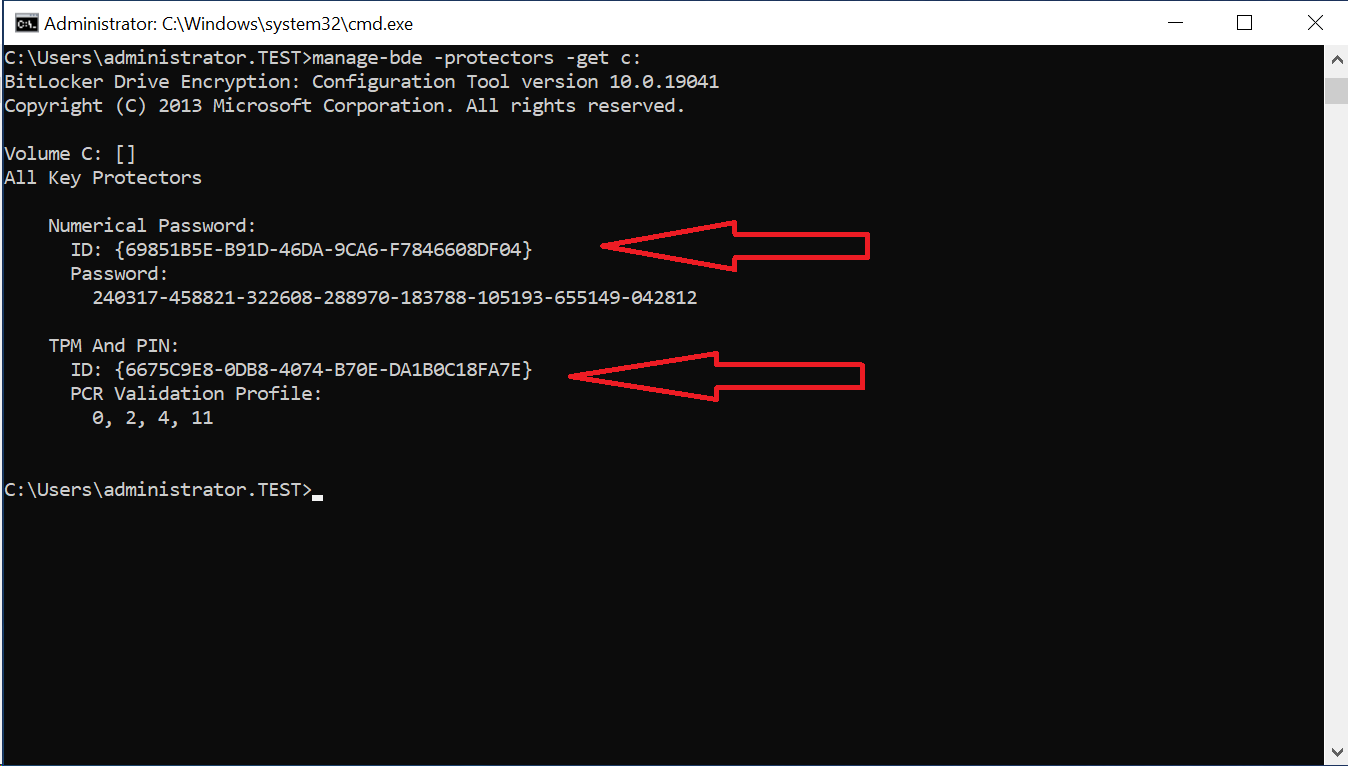
manage-bde -protectors -get c:. You will see all the key protectors for the drive; in this case, aNumerical Password(the recovery key), and theTPM And PIN.
Bitlocker Recovery Mode
When moving the drive to a new system (i.e. hardware repair), you need to tell the BIOS to boot off the drive. On Dell machines, tap F12 as you boot up, then choose the disk drive (NOT the Windows Boot Manager entry). It will then boot into Bitlocker Recovery, asking for the recovery password.
After successfully entering this password, it will unlock the drive, and re-initialize the devices. It will ask one more time for the Recovery Password (on the next reboot), then Windows should fully load. Login as an Administrator.
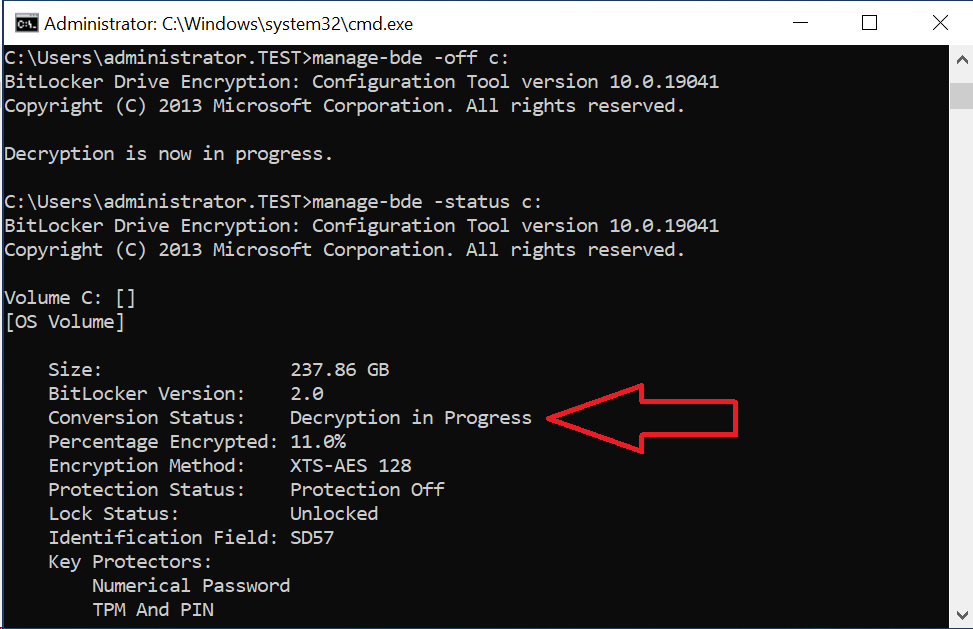
You will then need to disable the BitLocker protection, and set it back up. To turn it off from the command line, run manage-bde -off c:. It will tell you it’s in progress. The system will decrypt, and will resume decrypting if it restarts in the middle. To check the status, run manage-bde -status c:. You want the Percentage Encrypted to get to 0%.
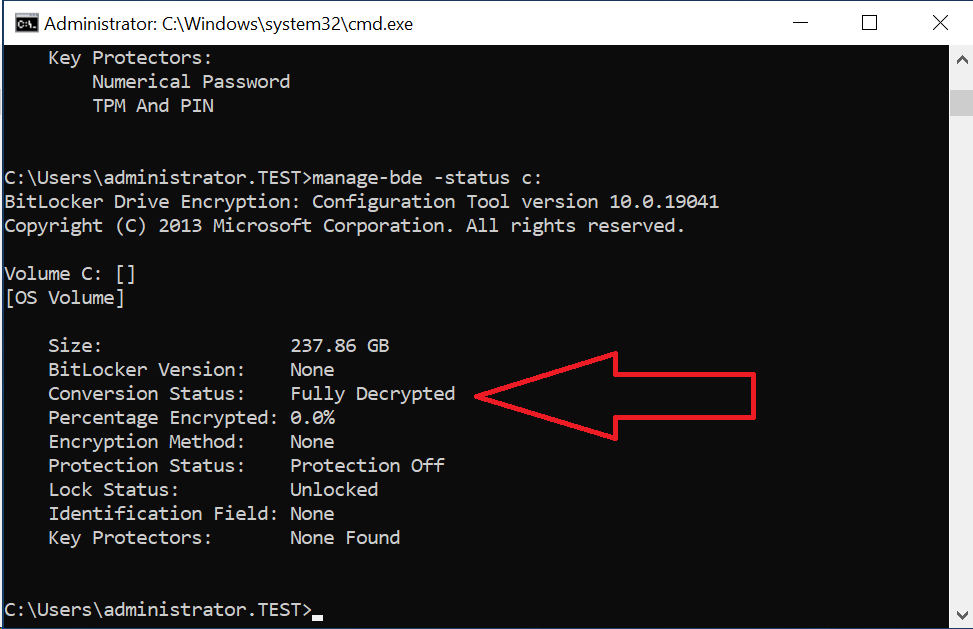
Once it is done, it should read that the drive is fully decrypted. You can then follow the steps above in On your target machine to set it back up.
Delegating authority
Active Directory has an extensive list of ACEs (Access Control Entities) to make up ACLs (Access Control Lists). This includes to objects in the Active Directory, not only files or folders.
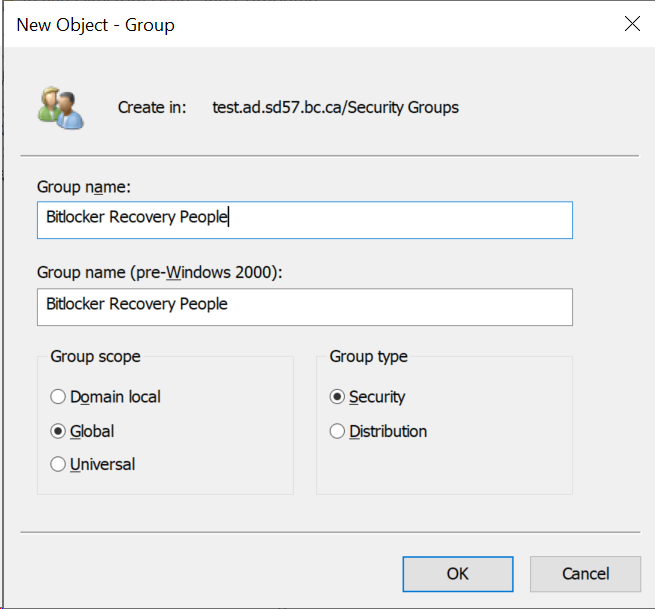
For example, you can set a group (i.e. Helpdesk) to be allowed to reset passwords for user accounts, create or delete accounts, or view Bitlocker keys. This helps with giving only the access required. We will create the group Bitlocker Recovery People under the Security Groups container, add your personal Admin account to it (i.e. A-jdoe), then delegate the permissions required to view the Bitlocker recovery keys.
Open Active Directory Users and Computers.
Navigate to the Security Groups OU
Right-click a blank area on the right, point to New, and choose Group.
Fill in the Group Name in the top text box. The second text box will fill in automatically, and leave the default Group scope and Group type. Click OK to create the group.
Navigate to where your personal admin user is. Right-click your user, choose “Add to group”.
Add the user to
Bitlocker Recovery People. Click OK.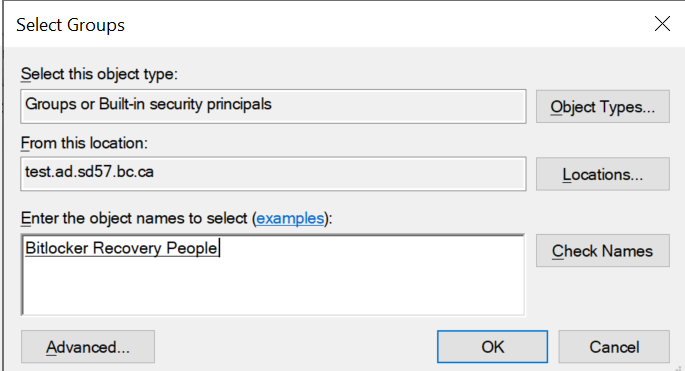
Right-click the domain, and choose Delegate control…. Click Next on the first screen.
Click Add, and choose your
Bitlocker Recovery Peoplegroup. Click Next.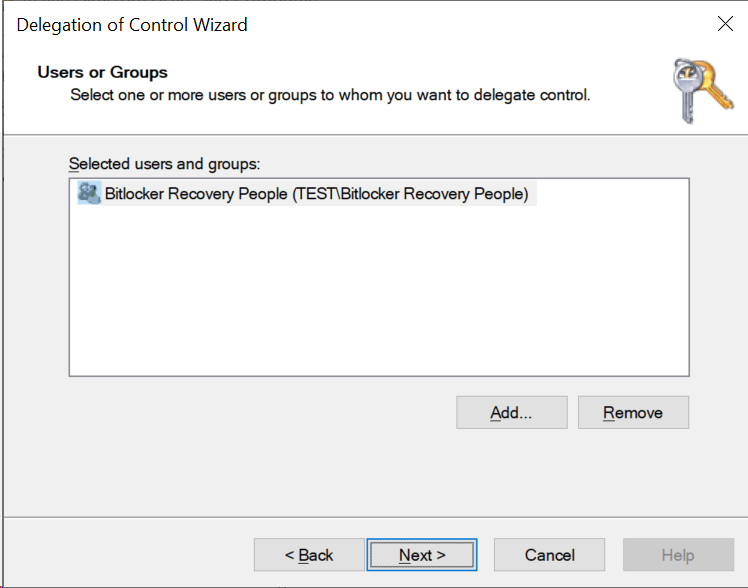
Select “(o) Create a custom task to delegate” and click Next.
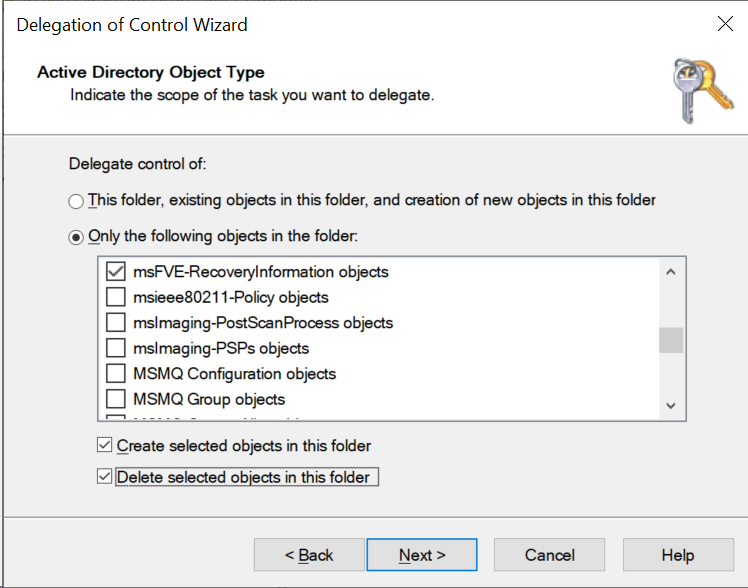
Select “(o) Only the following objects in the folder:”. Scroll down the list, and choose “ msFVE-RecoveryInformation objects”. Tick the two boxes at the bottom to allow the group to “Create and Delete the selected objects in this folder”. Click Next.
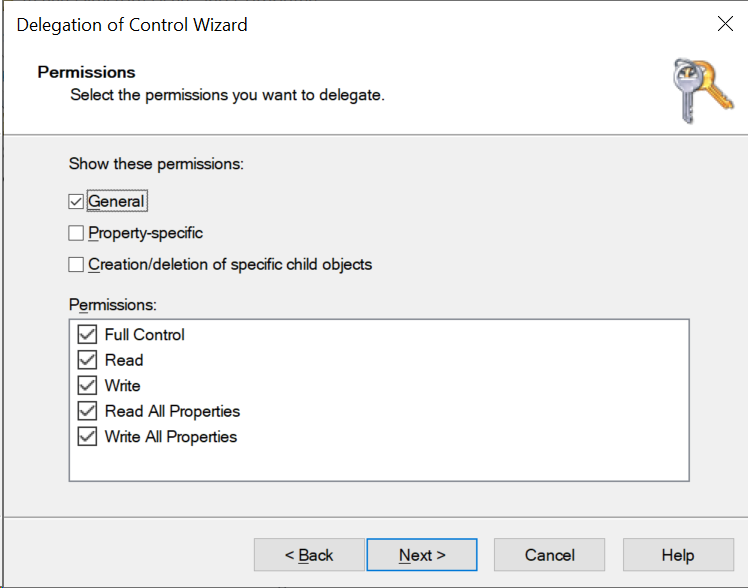
Choose “ General” only, then “ Full Control” from the Permissions list. Click Next.
Click the Finish button.
Anyone logging in as a member of Bitlocker Recovery People, and who have the Active Directory Users and Computers component installed, will be able to view the Bitlocker recovery keys. To keep with the rules of RBAC (Role Based Access Control), only assign groups permissions, not individual users.
