So today, I was helping someone with a multi-site WordPress issue, and I linked to my blog. But guess what? It wasn’t coming up! All my external tests seemed to work, including Down for Everyone or Just Me, and even Cloudflare! I could still SSH into my server (as I was watching log files scroll by anyways!), so I knew it was up and accessible. So, what’s next?
Well, I checked my work’s proxy logs to see if it was even hitting my website (tail -f /var/log/squid/access.log /var/log/squid/cache.log), but its output didn’t show any hits to this blog! I checked my Network Settings in Firefox - Yup, it is set to use the proxy.pac file on our network. I tried clearing my cache, and trying again - No change!

So, I launched PuTTY, and created a tunnel to my home Linux server. In the main window, I connected as I would any other SSH session, by using the format [email protected], on port 22, with SSH. Then, on the left, I go down to Connection->SSH->Tunnels. I enter a source port (above 1024), choose Dynamic for the destination, then hit Add. What this does is forward anything on my local system that tries to connect to the port specified to go to the other side of the tunnel instead. Essentially, if I move my web browser there, it will look as though the web browser is operating on that network.

Setting up the browsers
You can do it in Firefox natively, or do it as a system wide setting (through Internet Explorer). In Firefox, click the Firefox menu (or press Alt), go to Tools, then Options. Navigate to Advanced, Network, Settings. On the new window that pops up, choose “Manual proxy configuration:”, and only fill in the SOCKS Host section. Use 127.0.0.1 for the host, and whatever port you chose in PuTTY. Choose SOCKS v5 (unless you know you don’t have a newer system to connect to!), then OK.
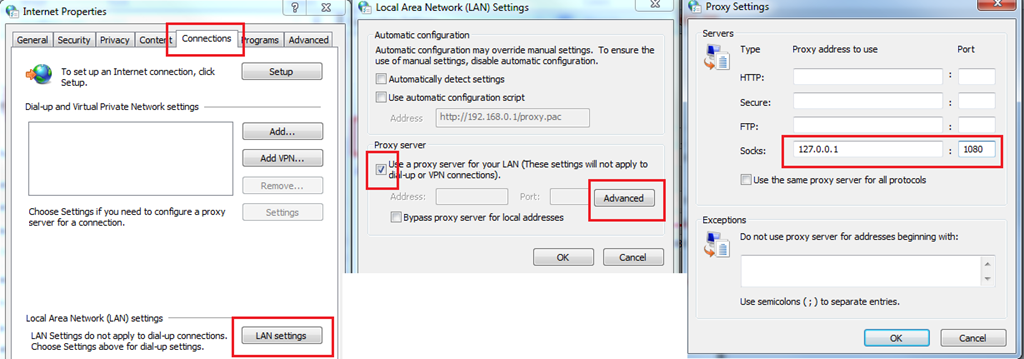
For Internet Explorer (or Google Chrome, which just uses the System Proxy settings anyways), you can access it one of two ways. From the Control Panel, choose Internet Options. Or, from within Internet Explorer, go to Tools->Internet Options (there are about 20 other ways too, but I’m not going into that!). Choose the Connections tab->LAN Settings. Choose the ‘Use a proxy server for your LAN’ check box, then choose Advanced. Type in ‘127.0.0.1’ for the Socks host, and the port we chose above. Hit OK until you’re out of there.

Now what?
So, other than getting around issues with a workplace not allowing certain sites through, what can this do? It gets you through censorship, and also blocks anyone on the path to that server from knowing what you are actually accessing. Yes, it would be possible to go to porn sites using this. Would I? Hell no! I may know what this job monitors, but there’s still a line of integrity that I refuse to cross! I mostly use it for administering my router at home, or getting access to a tool I need for my job in IT that is typically blocked at a level above the lowly IT guys at each location.
So, in short: create the tunnel in PuTTY. When you hit the Open button in PuTTY, it will simply ask you for a password, then wait there. Type your password, press Enter, then enable these proxy settings. As far as your web browser is concerned, it’s acting as part of the server. Go ahead, try accessing your router at http://192.168.0.1 (or 1.1, who knows!). You should see your router’s login page load, instead of your company’s router.
Remember, use this power for good! Do not use it for anything that can get you fired! I assume no responsibility for the information on this page, I just mention that it’s an option.