
Summary: SSH Agents hold your SSH keys while you traverse to other SSH targets, without revealing your private keys.
Longer Explanation
The concept of SSH keys should not be lost on you; if it is, check out my post about SSH keys made easy.
However, if your ~/.ssh/authorized_keys file is getting long, and especially if you’re the only user, then you could use an SSH agent to help out.
When you SSH with keys, your client machine sends a challenge to the target server, encrypted with your private key, and requiring your public key to decrypt the challenge, and send it back. If this process succeeds, you log in, not needing a password. The issue with this is if you have keys upon keys upon keys… ARGH, it becomes hard to manage!
My SSH agent runs, and provides my 2 SSH keys to all the servers I connect to. Using Agent Forwarding, it also sends my keys to remote-remote servers, without my remote server knowing my private key!
Getting Started
First ensure you have SSH keys generated on your client - the one that you initiate your very first SSH connection from. In my example, I can use PuTTYgen (for PuTTY, WinSCP, etc) or Windows Subsystem for Linux (which I’ve fallen in love with!)
Using PuTTYgen
Open PuTTYgen from the Start Menu. If you already have a private key, you can load it here and go to step 2; otherwise, click on Generate to create a new one. You’ll need to copy the text in the
Public key for pasting into OpenSSH authorized_keys fileinto the target servers’~/.ssh/authorized_keysfile. You will also need to use theSave private keybutton to save the key (as a*.ppkfile).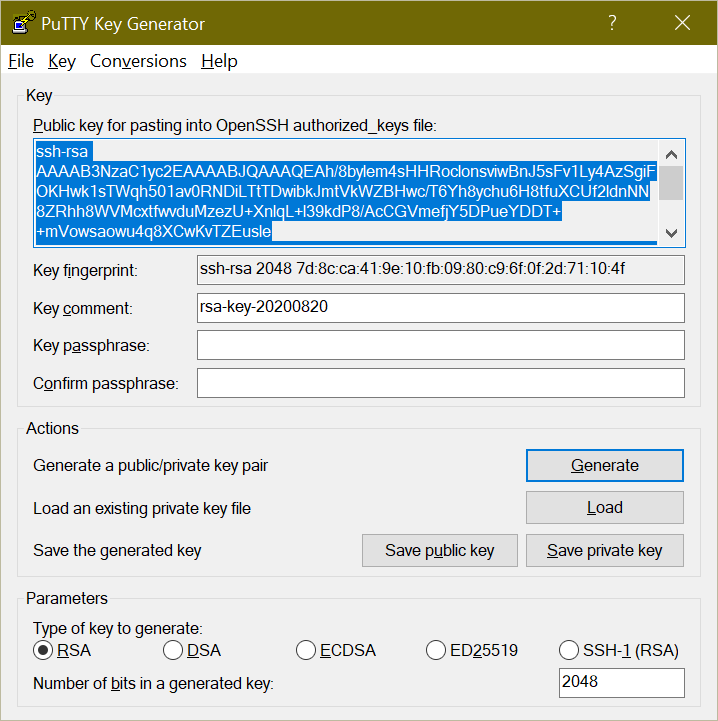
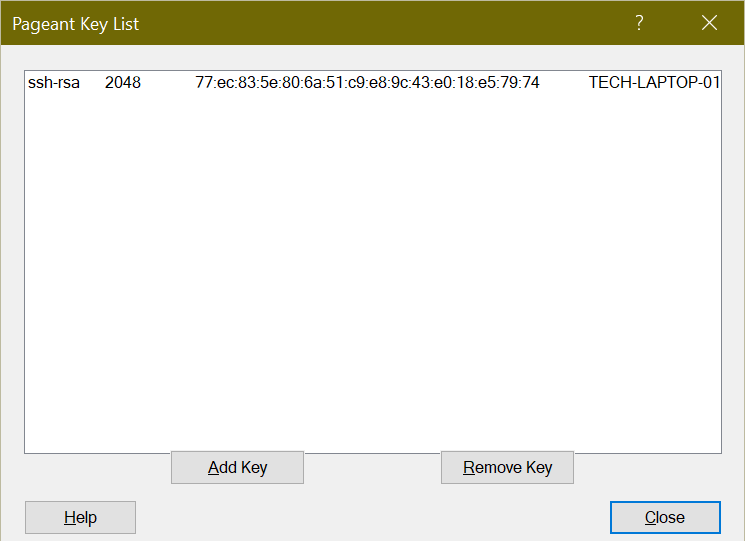
To ensure your Private Key is loaded, you need to use Pageant (also coming with PuTTY). If this isn’t running, double-click on your Private Key. If you chose to add a passphrase, you’ll need to enter it now.
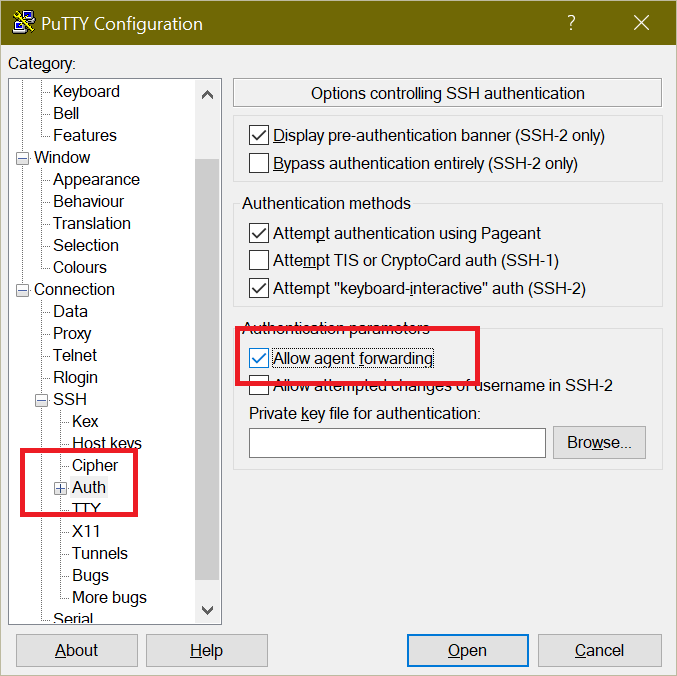
Start entering your SSH session details in PuTTY. Before connecting, on the left side, navigate to Connection \ SSH \ Auth, and choose Allow agent forwarding on the right. This will let PuTTY forward your agent details to other servers while in the session.
Using OpenSSH or WSL
This assumes you are using the Bash shell on Debian/Ubuntu or similar. Your steps may vary.
- As the user you typically use, run
ssh-keygento create a new key. This key will save, by default, into~/.ssh/id_*SOMETHING*. It will also generate the*.pubfile to add to the target server’s~/.ssh/authorized_keysfile. Add it into there on your target server. - Run
eval `ssh-agent`. This will output the Agent’s PID on your client machine. This will also create a temporary file used as the socket that gets passed between servers. - Run
ssh-add ~/.ssh/id_*SOMETHING*to add your private key to the Agent’s keyring. To view the finger prints of your SSH keys that are loaded (even when on a target server), runssh-add -l(lower-case L).
Let’s see it in action
Start a new SSH session to your target server, with Agent Forwarding turned on. In PuTTY, use the checkbox; for OpenSSH, add the -A parameter to your SSH command (i.e. ssh -A [email protected]).
If your keys are lined up, you should be at the target server, logged in. Take this time to add your initial key to your other target servers in their own ~/.ssh/authorized_keys files. While you’re at it, remove keys that you don’t recognize or don’t need anymore. The keys that should be left:
- ones that you know
- ones from your client computers
- ones that are still existent
Ideally, you should have 2 or 3 keys on each server, assuming there is some automation that requires passwordless logins. If not, then you only need your one key in the list.
Let’s pretend you are logged in now to server.example.com, and want to SSH into secret-server.example.com. Normally, you’d need a key from server copied to the secret-server in order to login. If both server and secret-server have your new key, you can SSH into server.example.com, then ssh -A secret-server.example.com to use your local Agent’s keys!
To prove it’s only this session, SSH with a password (not a key) onto server.example.com, and attempt to SSH into secret-server without using the agent - if setup correctly, this will fail and it will ask you for your password.
Great, why would I do this?
The first reason is security. If your servers can SSH to each other without a passphrase, a hacker only needs to gain access to one server, and they can spread their attack laterally.
Along with this, if there are keys you don’t recognize, or don’t have control over, then you don’t really know who’s logging in to your server (unless you’re scouring the /var/log/auth.log constantly). By limiting the authorized_keys file to only one key that you know and have, you prevent this attack.
Finally, a personal anecdote. We use a Version Control System at my workplace, and the system relies on Git, which can be done over SSH. Since I’m a good security-conscious employee, I enabled 2FA on my account, so I cannot do command line operations over HTTPS anymore - I must use SSH. The system expects us to then use the git user for cloning or pushing, but still requires us to login. I used to have to add all my servers’ and VMs’ public keys to my profile. This was becoming a big pain, as operations would time out when you have more than 50 or so keys for a single user, let alone all the other employees with access.
Now, I have two keys in this system - one for each of my two work computers. Using Agent Forwarding, the servers I connect to will pass on my private keys to the VCS, and it will instantly authenticate as myself.
Simplicity, Security, Sexiness - who doesn’t like a system like that?